Emu68-Imager
Amiga Utilities instructions
When the Imager finishes writing the image to your SD card you can insert it into the SD card slot of your RaspberryPi.
After turning your Amiga on you should see the Emu68 Logo on your HDMI output.
First Time Run
Ideally (though it is not essential), the Amiga should have both a HDMI monitor and standard Amiga monitor connected since both are used on the First run.
The first time the SD card is booted there will be several additional steps to perform:
Buptest
Buptest is a check to ensure that communication between the Amiga and the PiStorm is functioning correctly. During the test your HDMI output will show several lines of text detailing the operation. If the test fails then you should seek to either correct any obvious problems with the placing of the PiStorm on the edge connector, or ask for help on the official Discord server HERE.
If all is well, your Amiga will continue booting Emu68. From this point on, all output will switch to your normal (RGB) Amiga monitor.
After the Amiga successfully boots into Workbench the first time, the Buptest stage will be disabled - a successful run is only needed once and it consumes boot time.
Currently Buptest does not run correctly for Pistorm under 3.1 so it is disabled should you install 3.1.
Workbench finalisation
There are several scripts included that will finalise the installation of Workbench, including:
- Setting PAL/NTSC monitors.
- Setting HDToolBox and Fat32 partition driver according to your RaspberryPi (rPi3/4).
- Deletion of unnecessary libraries.
- Setting up iBrowse, PFS3.
- Tidying up Icon positions.
Locale preferences
At this step, you will be asked to set up your Locale preferences. This is important for the clock to be set correctly when you go online (which is a requirement for accessing https sites). Note that this will not necessarily change your keyboard localisation settings, which you may need to complete after first boot has completed.
Additional settings after Workbench first boots
RTG Screenmodes
By default, Workbench will boot to a standard non RTG screenmode, though RTG has been sewt up. We have also provided a Picasso96 settings file with many useful resolutions pre-set for you. Just run the ScreenMode preferences and set any resolution you like.
All RTG resolutions will display on your HDMI display, whereas PAL/NTSC et al will show on your Amiga (RGB) monitor.
Workbench will be much snappier with RTG enabled, and you will be able to enjoy millions of colours alongside maximum available Chip RAM. We have also installed PeterK’s icon library that takes advantage of all these colours so you can install PNG icons in all their glory.
It is highly recommended that you take advantage of this display functionality when using a PiStorm, though not mandatory - AmigaOS will happily run without RTG, albeit with a maximum of 256 colours and greatly reduced ChipRAM availability.
Formatting of extra Work partitions
If your SD Card is bigger than 100GB and you set up the Work: partition to be bigger than 101GB (the maximum PFS supports) then it will be split into additional partitions.
The first partition named Work: is already formatted, but you will need to format the rest yourself. Just select the Non Initialised partition icon and on the right click Icons menu select Format disk, then follow the instructions and format the partition.
PiStorm utilities and features included
Besides the usual Workbench Tools, Utilities and System Programs, we also included all necessary and useful PiStorm utilities - and also a selection of Programs that will help you with the PiStorm and Emu68 startup.
Both are placed in the same named folders on the Workbench: partition.
PiStorm tools
The included tools will enable you to monitor the status of Emu68, adjust all possible settings, start/stop and configure WiFi and more.
EmuControl
An essential utility to control everything Emu68 related. You can adjust how JIT performs, set Debug options and see some of the properties like core temperature.
VC4Tweak
Lets you tweak the RTG graphics output with filtering options. When RTG modes are active, they will be scaled to the resolution you set in the imager tool’s display settings. This means that a lower resolution will be scaled up to match. Use this tool if the bilinear filtering bothers you, or you need to sharpen the filter a touch.
If you want the settings to be used next time you boot, you must edit the Devs/Monitors/Videocore icon tooltypes accordingly.
Emu68 Updater
As of version 1.0.6 of Emu68 Imager, you can now check for updates to Emu68 which will then automatically install to your SD card. Navigate to the Emu68-Updater folder and double click the Emu68-Updater. It will then check for any newer versions of Emu68. This will only check for new releases. It will not install nightly releases. It is set to work automatically if you have left Emu68 in the default location on the SD card (the root folder) as well you have left the name of the SD card as SD0:. If either of these have been changed you will need to edit the Emu68-Updater file and change the arguments for EMU68DEVICE and EMU68PATH.
Online / Offline / WiFi Config
As of version 1.0.6 of Emu68 Imager, this provides a GUI to complete the information:

Enter the details in the screen and press save. Once you have done this, you can close the window.
If you correctly set up your WiFi SSID and Password in the imager tool, you can now double click on the Online icon and your Amiga should immediately attempt to connect to your Wifi-enabled router.
As of version 1.0.6 of Emu68 Imager, this is now the OnlineWifi icon.
Also as of version 1.0.6, use the OnlineGENet icon to use the genet.device to connect to a wired network. Currently this will only work if you are running a minimum Kickstart 2.0.
The installation includes a demo version of Roadshow TCP/IP stack which will grant you a trial of up to 15 minutes online activity after which you will need to reset your Amiga.
Double-clicking the Offline icon will stop the TCP/IP stack and you will disconnect your Amiga from your Wifi.
Due to limitations in the demo version of Roadshow you may need to reboot your Amiga to go back online. We encourage you to consider buying the full version of Roadshow which does not have these limitations.
If you didn’t setup the WiFi SSID and Password before (or you want to change it) then you can use the WiFi Config icon which will allow you to edit the wifipi.device configuration file.
Currently the wifipi.device requires you to connect to a wireless network which is WPA2 with CCMP-AES encryption (NOT WPA/WPA2 mixed Mode and NOT TKIP encryption).
Some users have reported issues with the following:
- Shared 2.4 and 5Ghz networks sharing the same SSID
- Connecting to a 5ghz network
- Mesh networks
- Where the channel number of the wireless network is something other than channel 1
Also note some routers (particularly those provided by Telcos) can be locked down such that the ability to modify some settings is restricted.
If you are encountering issues connecting consider the above (i.e. trying a network in the 2.4ghz band with channel 1 and which is not a mesh network). Connecting to a wireless phone hotspot as a troubleshooting step can also be useful if you are encountring issues.
If you wish to check your network is correctly set up for connection to your Amiga, running the command “netsh wlan show networks mode=ssid” will provide analysis of available networks.
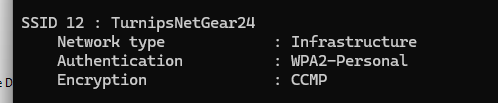
Your network should show as WPA2-Personal and with encryption of CCMP per the example in order for it to successfully work with your Amiga.
Your speeds are dependent on a variety of factors, including the tcp.recvspace, udp.recvspace, tcp.sendspace, and udp.sendspace settings within Roadshow.
As of version 1.0.6 of Emu68 Imager, you can change these via the tooltypes for the relevant connection icon (as different settings are likely best for Wired vs Wireless connections). In order to see the current settings you can run C:roadshow from the shell.
As of version 1.0.6.3 the settings are contained within a textfile called RoadshowParameters. Double clicking on the icon will allow you to edit these settings per the device you wish to change.
Emu68Meter and Emu68Info
These two utilities will display the status of Emu68 and provide information on the model of Raspberry Pi used.
SMB Config
The SMB Config icon will bring up the included text editor with the configuration file for the included Samba driver. You can enter the connection string to your Samba share at the end of the file.
As of 1.0.6 of the Emu68 Imager, SMB Config provides a GUI to enter the information:
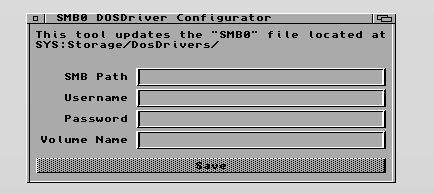
Once you have entered the details, press save. You can then close the window.
When you elect to mount the Samba share, you should navigate to the SYS:Storage/DOSDrivers folder and double click the SMB0 icon - or you can use the MountSMB button in Directory Opus (right clicking on the same button will allow you to unmount the Samba share volume).
TransferKick
If you wish to use WHDLoad Games and/or Demos then the appropriate kickstart ROM files must be present in the Devs:Kickstarts drawers.
We have provided this script in order to make it easier for you to copy the correct kickstart files automatically to that location from the FAT32 partition.
For this script to function, you must copy all your kickstart rom files into the folder named Kickstarts on your FAT32 partition. After you boot your Amiga, double-click on the TransferKick icon and the script will check for all suitable kickstart rom files and copy them to Devs:Kickstarts for you.
InstallPackages
This script can install custom packages that you have in the Fat32 partition’s Install folder.
In the future we will make available packages that you can install for free. Just copy the Package (a simple .lha file) into the Install folder, boot your Amiga and double click the InstallPackages icon.
Please refer to the Additional Packages section of the documentation for further information.
Documentation
This will launch IBrowse with the documentation saved on the SD card (you don’t have to be online to view it). Full documentation is available on your Amiga.
Programs
In addition to PiStorm tools we have also included a few essential/useful programs to complement your chosen AmigaOS.
Roadshow (demo)
Roadshow TCP/IP stack is included because it is the only TCP/IP stack that is still maintained for Amiga. It is a commercial product but we were graciously allowed to distribute the demo version with the tool. It is restricted to 15 minutes of online time, after which a reboot is required to connect again.
Please consider buying the unrestricted version from the author. More info in Programs Used by the Tool
Directory Opus 4
This is one of the more commonly used file management tools on the Amiga. It is the pinnacle of the double-panel browser genre and no Amiga installation should be without it. We have also provided additional functionality (such as archive extraction) so it is all set up and good to go.
IBrowse (demo)
The demo version of the web browser for Amiga. This tool is essential, and if you use it regularly you are encouraged to buy the full version. Documentation for the installation - both the Imager tool and the AmigaOS portions - uses IBrowse for display. Ibrowse will facilitate browsing all of the Amiga related sites such as Aminet, EAB et al.
SnoopDOS
A Utility that lets you see what files and resources your AmigaOS is utilising and attempting to access. Essential to debug problems and find out what your system is missing.
HippoPlayer
An essential module (and much more) player that is still being developed. The latest version will be installed for your convenience.
SysInfo
The most commonly used program to display how fast your Amiga is and what is inside.
AmiSpeedTest
Once online, this tool will test how fast your transfer rate is.
Jano Editor
A free and feature-rich Editor. This is especially needed when running AmigaOS 3.1 as it lacks a decent text editor by default.
AmiSSL, Picasso96, MUI
These are pre-installed for your convenience and are essential for smooth operation of a PiStorm-enabled Workbench experience.
Please refer to What’s Included section to see where the tool downloads these programs and their documentation.